

Your solar array has been exporting surplus power at midday while you buy electricity back at peak rates every evening. Adding a battery is the obvious fix — but most retrofit projects are quoted at six to eight weeks, and that timeline is usually the reason the decision keeps getting postponed.
It does not have to take that long. On a standard site, a well-prepared fast solar storage retrofit can move from go-decision to commissioning in seven calendar days. The trick is not faster installers or more expensive hardware. It is sequencing: run the design, permitting, procurement, and pre-commissioning work in parallel instead of in series, then use an AC-coupled topology that leaves your existing PV system untouched. This is the playbook our engineers use when a buyer needs storage online before a demand-charge season, an outage season, or an incentive deadline.
This guide is part of the solar retrofit battery storage series for buyers and project teams planning storage on an existing PV plant.
What a Fast Solar Storage Retrofit Is (and What It Isn't)
A fast retrofit means adding a battery to an existing solar system without reworking the solar side. The existing PV inverter stays in place and keeps converting panel power as it always has. A separate battery inverter — sometimes called an ESS inverter or PCS — connects on the AC side of the building, and the battery charges from surplus solar or off-peak grid power and discharges when your load or tariff profile says it should.
Seven days is achievable when three conditions hold:
- The existing PV system is healthy and its inverter is supported by its manufacturer.
- The site needs an AC-coupled add-on, not a DC-coupled redesign.
- Permitting and interconnection can run in parallel with procurement and installation (more on this below).
It is not achievable — and should not be rushed — when the project requires replacing the PV inverter, upgrading the main panel, or moving large equipment through a building that cannot tolerate downtime. Those projects belong on a slower track, and we will come back to them in When to Plan a Slower Retrofit Instead.
Here is the full seven-day program at a glance. Notice that several workstreams share the same calendar days — that overlap is where the weeks disappear.
Day | Workstreams running | Exit criterion |
|---|---|---|
Day 0–1 | Site audit, load-data pull, design freeze | One-line diagram and equipment schedule approved |
Day 1–3 | Permit application filed; hardware ordered; factory pre-commissioning slot booked; permit review runs in parallel | Purchase order issued; permit documents submitted; equipment on site (or confirmed ETA) |
Day 3–5 | Installation: cabinet placement, AC connection, critical-loads wiring, communications | Install complete; pre-commissioning checklist signed |
Day 6–7 | Commissioning, export settings, utility inspection, handover | System live on monitoring; operator trained |
Day 0–1: Audit the Existing PV System and Freeze the Design
The entire schedule stands or falls on the quality of this audit. You cannot compress a project whose starting conditions are unknown, so Day 0 is about documenting what is actually on site:
- PV inverter make, model, firmware, and AC rating
- Array size, string configuration, and production history (pull a year of monitoring data if you can)
- The one-line diagram and the point of interconnection
- Your interconnection agreement and any export limits it sets
- Main panel rating and available breaker positions
- Load profile — 15-minute interval data if available, monthly bills as a fallback
- Whether backup power is a requirement (this decides if a critical-loads panel is in scope)
With that data in hand, the design decision takes a few hours rather than weeks: AC-coupled if the existing inverter is serviceable, DC-coupled if it is at end of life or the site is being repowered anyway. The full comparison — efficiency paths, export-cap constraints, and when inverter replacement actually pays — is covered in our AC-coupled vs DC-coupled retrofit guide. For a fast retrofit, the default is AC coupling, because it keeps every man-hour off the roof and out of the DC strings.
Sizing is a half-day job when you have interval data: target the evening load you want to shift, the peak demand you want to shave, or the critical loads you want to back up. A rough first pass with a battery kWh calculator gets you in the right band before the detailed model.
Exit criterion for Day 1: the one-line diagram and equipment schedule are frozen. Nothing downstream moves until the design is locked — a change after ordering is how seven days becomes seven weeks.
Day 1–3: Run Permitting, Procurement, and Pre-Commissioning in Parallel
This is the step that separates a seven-day retrofit from a six-week one. Most projects treat the sequence as design → permit → procure → install → commission, with each step waiting for the previous one. A fast retrofit runs three workstreams on the same calendar days:
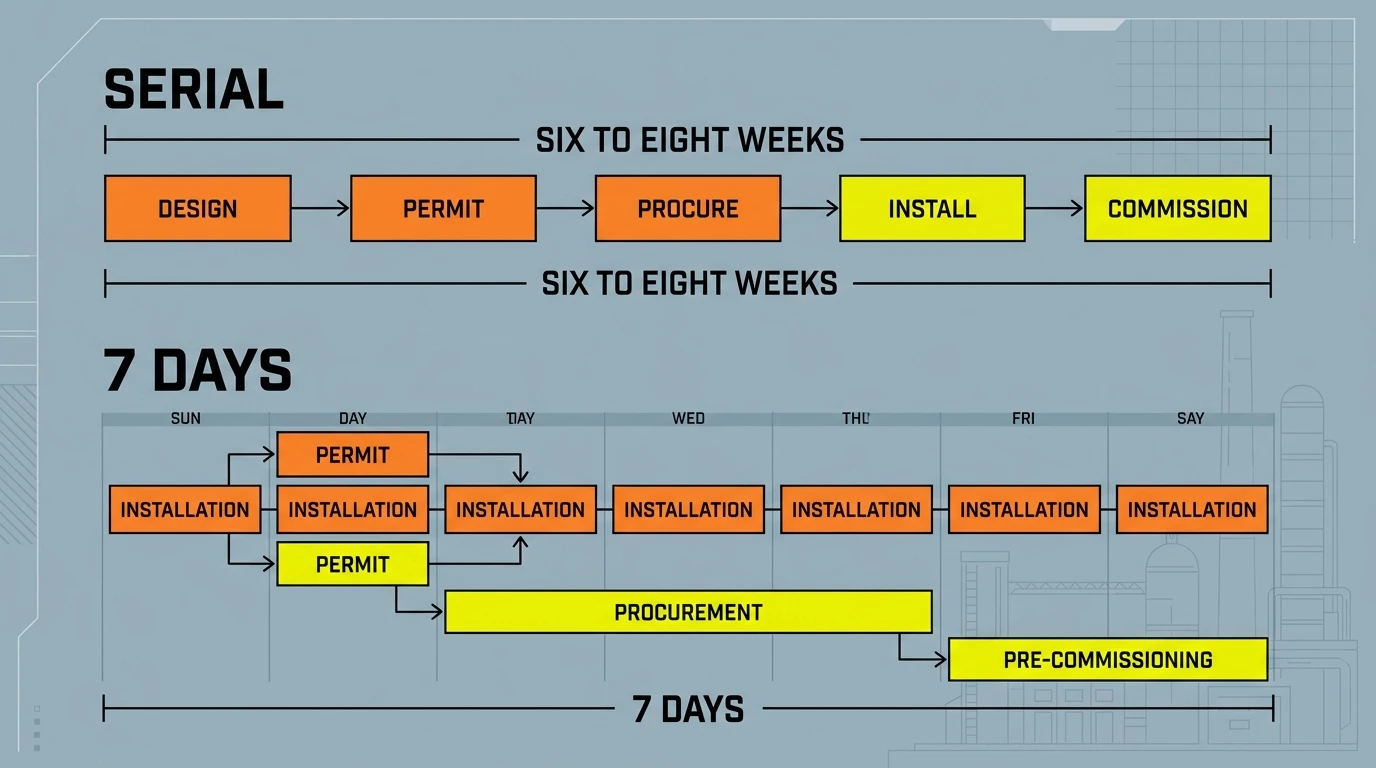
The same scope, sequenced differently: serial planning spreads the same work over six to eight weeks, while parallel workstreams fit it into seven calendar days.
Permitting. For an AC-coupled add-on, the permit package is small: the one-line diagram, equipment data sheets, and a load calculation. File it on Day 1. Many jurisdictions approve standard AC-coupled add-ons in two to four business days. While the permit is in review, the install crew is not idle — that is the point.
Procurement. Order the battery, ESS inverter, and balance-of-system components on Day 1–2. The single biggest lever here is choosing factory-integrated hardware: a battery and inverter that ship as one pre-assembled, pre-tested unit instead of loose parts to be wired on site. An AC-coupled storage cabinet line with the inverter, battery racks, cooling, and protection already integrated inside one enclosure can cut on-site electrical work from days to hours. Factory pre-commissioning also means the unit arrives with a signed test record, which shortens commissioning and gives the utility inspector something concrete to check.
Pre-commissioning. Book the remote commissioning slot and the electrician's window before the hardware arrives. Prepare the settings template (export limit, time-of-use schedule, reserve margin) while you wait, and confirm the monitoring account structure. If the site needs a crane or pallet jack for cabinet placement, book it now — equipment rentals are a classic hidden week.
Exit criterion for Day 3: purchase order issued, permit submitted, and the install window confirmed. If the hardware lead time from your supplier exceeds the parallel window, the fast track fails at procurement — so confirm stock or lead time before freezing the design, not after.
Day 3–5: Install Without Touching the Roof
AC-coupled installation is deliberately small. No panels are moved, no strings are restrung, and no work happens on the roof. The crew's scope is:
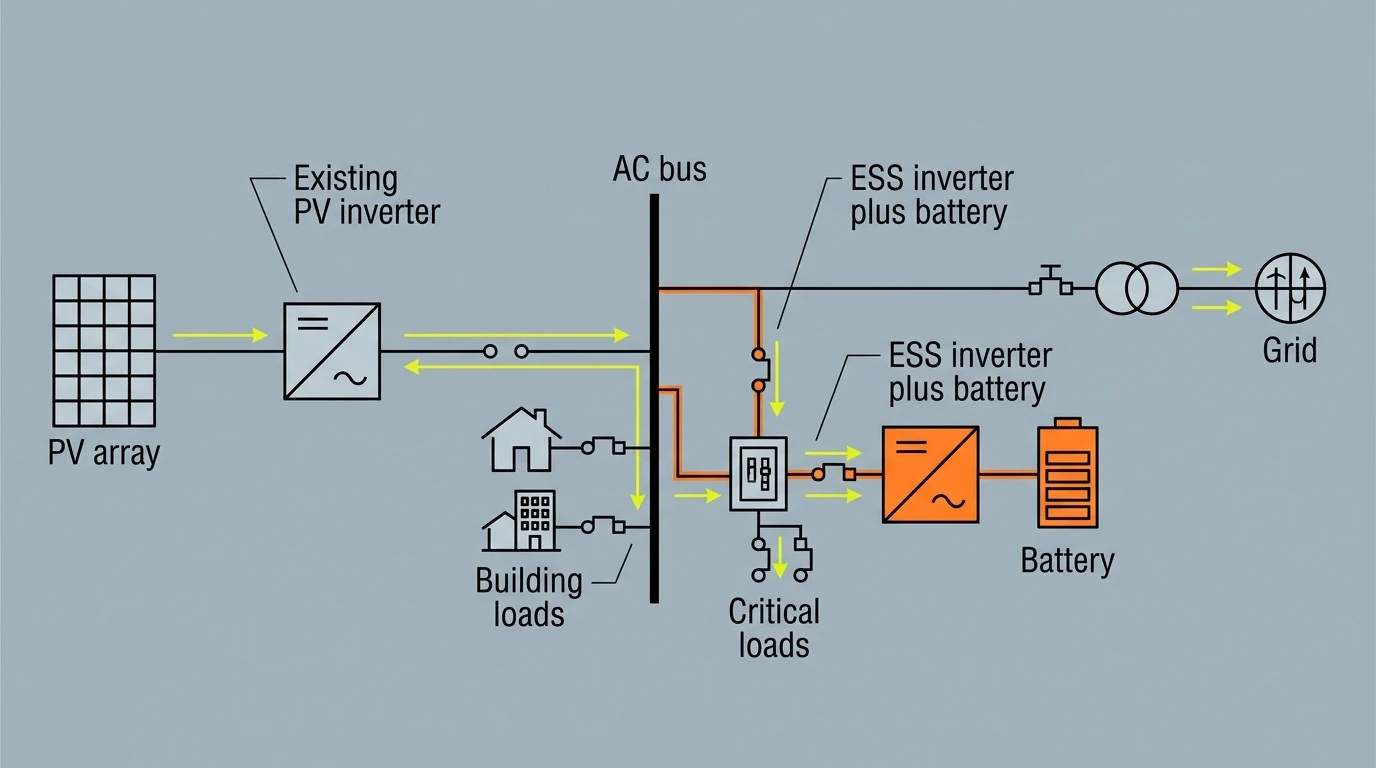
An AC-coupled retrofit keeps the existing PV inverter on the AC bus and adds the battery through its own ESS inverter, with a critical-loads branch when backup is in scope.
- Place the battery cabinet or rack in its approved location (check clearances, ventilation, and wall rating before you buy — see the compatibility gates below).
- Connect the ESS inverter to the AC side of the site electrical system through the new breaker.
- If backup is in scope, wire the critical-loads panel and transfer/islanding arrangement.
- Grounding, overcurrent protection, and communications wiring (Ethernet or RS485 to the gateway/monitoring).
- Label everything per code — rapid-shutdown and disconnect labels included.
A pre-assembled unit like Hua Power's HC-UPSA241 AC-coupled cabinet — 125 kW / 241 kWh in one outdoor enclosure that connects to the AC side of an existing PV inverter — typically lands in a day or less of crew time, because there is no battery-to-inverter wiring to do on site. The remaining days go to panel work and wiring runs, which are the parts that cannot be pre-fabricated.
LFP (lithium iron phosphate) chemistry is the standard choice for retrofit storage: long cycle life, stable thermal behavior, and no cobalt supply-chain questions. Your installer should be able to give you the UL-listed system listing for the exact cabinet model — see the gate below.
Exit criterion for Day 5: installation is mechanically and electrically complete, and the pre-commissioning checklist is signed off by the crew lead.
Day 6–7: Commission, Configure, and Hand Over
Commissioning an AC-coupled retrofit is mostly configuration, because the hardware was pre-tested at the factory:
- Verify the PV inverter and battery inverter can talk to each other. For grid-following PV inverters, confirm frequency-shift curtailment or SunSpec-compliant communication so the battery can throttle PV during an outage instead of overcharging.
- Set the operating modes: self-consumption, time-of-use arbitrage, or demand-charge management (for C&I sites), plus the reserve margin you want to keep for outages.
- Configure export behavior. If the interconnection agreement caps export, set the export limiter so the battery never pushes more than allowed — a zero-export setting is common on sites with export limits.
- Confirm the battery management system (BMS) is reporting cell voltages and temperatures to the monitoring platform, not just pack-level state of charge — the BMS is what catches a bad cell before it becomes a safety event.
- Run the utility inspection and interconnection paperwork to close out permission to operate.
- Hand over: operator training, as-built drawings, warranty registration, and the monitoring dashboard.
Exit criterion for Day 7: the system is live on the monitoring platform, settings are verified against the approved design, and the operator can read the dashboard and change modes without a call to the installer.
Compatibility Gates That Decide Whether 7 Days Is Realistic
Before you commit to a retrofit solar storage project, run these four gates. They are the difference between a seven-day project and a project that stalls on day one. For most sites you can add battery to existing solar without touching the PV array — the gates decide whether the fast path applies to yours.
Gate | What to check | Pass → | Fail → |
|---|---|---|---|
Inverter communication | Does the existing PV inverter support frequency-shift curtailment or SunSpec? Is its firmware current? | Fast track: AC-coupled add-on works | Slow track: may need inverter replacement or communication gateway retrofit |
Panel capacity and backfeed | Main panel busbar rating, breaker positions, and backfeed limits (NEC 705 rules) | Fast track | Panel upgrade required — slow track (and a separate permit) |
Export limits | Interconnection agreement caps, meter configuration, utility export rules | Fast track with export limiter configured | Utility study required — add weeks, plan accordingly |
Battery location and safety | Floor/wall rating, clearances, ventilation, setback distances; system holds a UL 9540 listing for the exact configuration | Fast track | Relocation or enclosure work — slow track |
These gates are also where microinverter systems and older string inverters behave differently. Most AC-coupled batteries work with microinverters, but verify ride-through and islanding behavior on the specific models — the compatibility table in the AC vs DC guide lists the failure modes.
Retrofit Costs, Payback, and Incentives
A retrofit solar battery project has three cost line items: hardware (the biggest), electrical work and panel or critical-loads modifications, and soft costs such as permits, engineering, and commissioning. Costs vary more with site conditions than with battery price, so a quote means little until the Day 0 audit is done. For a residential-scale AC-coupled add-on, a realistic installed range is roughly $10,000–$25,000 depending on capacity and backup scope; a commercial retrofit is quoted per project, usually in the $50,000–$500,000 band for the 100 kWh–1 MWh range.
The value side is where the economics are actually decided:
- Demand charges (C&I). A battery that shaves one or two demand peaks per month can cut a meaningful share of the demand line on the utility bill. Our commercial peak-shaving guide walks through the calculation with real tariff structures.
- Time-of-use and self-consumption. Shifting evening imports to stored solar is the residential workhorse and a solid secondary value stream for businesses on TOU rates.
- Backup value. The U.S. Energy Information Administration's 2024 outage report puts the average customer at 11 hours of power interruptions in 2024 — nearly double the prior decade's average. Outage exposure is a real cost, and energy storage is one of the few assets that covers both bills and blackouts.
- Incentives. U.S. residential projects can claim the 30% Residential Clean Energy Credit for qualifying battery storage (at least 3 kWh, new equipment) — paired with an existing solar array, the credit applies whether the battery charges from solar or the grid; commercial projects typically apply the federal investment tax credit at the same base rate (the full 30% usually requires prevailing-wage compliance) — confirm eligibility with your tax adviser, because rules differ by project type and state.
Market timing matters too. As pv magazine noted, designing for storage now is a hedge against more expensive or infeasible retrofits later — the retrofit premium is not a myth, and the longer you wait, the more likely your site needs panel or inverter work that a retrofit today would avoid.
When to Plan a Slower Retrofit Instead
The honest exceptions to the seven-day promise:
- DC-coupled or hybrid-inverter replacement. Swapping the PV inverter, re-stringing, and retesting protection behavior is a different project with a different schedule. Do it when the inverter is near end of life — not to save a week.
- Panel upgrades. A service-panel or busbar upgrade adds its own permit and inspection cycle. Budget two to four extra weeks.
- Utility studies. If the interconnection agreement has no headroom and the utility requires a study, that clock is external. Start the application early and let the rest of the project run around it.
- Multi-MWh commercial systems. Large sites have more engineering, more protection coordination, and often more stakeholders. The parallel-workstream principle still applies; the calendar just grows.
If your site lands in one of these buckets, don't cancel the project — plan the solar battery retrofit on a schedule that fits the constraint, and keep the parallel-workstream discipline. There is also a middle path: retrofit battery storage in phases. Install the AC-coupled unit that fits the current panel and export limits now, and add capacity later as tariffs or loads change. Modular cabinets make that a repeat of the same seven-day program rather than a fresh engineering project.
Start Your Fast Solar Storage Retrofit Today
If the compatibility gates look passable, the fastest way to know for sure is to run the Day 0 audit with someone who can read the results. Here is the five-step start:
- Pull the inverter model, firmware, one-line diagram, and 12 months of interval load data.
- Check the four gates: inverter communication, panel capacity, export limits, battery location.
- Get a firm hardware lead time and a factory pre-commissioning commitment from your supplier.
- Lock the design and issue the purchase order the same day the audit passes.
- File the permit application the same week — parallel, not sequential.
For sites that need a battery online quickly, Hua Power's engineering team works from a one-page brief: application, existing inverter make and model, array size, and target capacity. They come back within one business day with a configuration, certification package, and lead time — including integrated PV+BESS systems when the site is growing beyond a pure retrofit. Send the brief through the contact page and ask for the fast-track program.